12 Mar 2015

Mini raspberry cheesecakes

I love cheesecakes (in case you haven't gathered that by now) and would probably make one every time I'm on dessert duty for family gatherings if I was allowed to! Such a high effort-to reward ratio don't you think? ;) These are really yummy and so pretty. I adapted this recipe. I just blended the raspberries with some icing sugar to make a sauce that I could swirl in. I didn't add any limezest either. Another  great mini cheesecake recipe is this one from a few years back!


Before going into the oven

After coming out of the oven


No bake cookies and cream pops


These are super easy and fun to make. Definitely something you can make with children! And everyone that has had them really enjoyed them.(Oreos happen to be my older sons favourite biscuit).  I have made them a few times-once for my sons end of year at nursery. For that I ordered some little bags and ties online (lollipop sticks also bought online), it was such satisfying work putting them in the bags and tying the ties.:) The cardboard cakepop holder is the Wilton brand one bought from Jhon Lewis and I really wouldn't recommend it - It didn't assemble or hold the pops very well. I stuck to a very simple decoration but of course you could go to town with faces and all sorts especially as they are so easy to make. Also if making during a heatwave the cream cheese will go very soft so best to keep half the mixture in the fridge while you do the first lot of pops. I found dipping the pops didn't really cover them in chocolate and so used a teaspoon to help with the covering.   Recipe is below-enjoy! 


Recipe from Lorraine Pascals Fast, Fresh and Easy Food

Lollipops:
2 X 150 g packs of Oreo biscuits
150g cream cheese

Coating: 200g white chocolate
2 tsp of sprinkles/decorations  

Equipment: Large baking tray, 18-20 15cm lollipop sticks

1. Line a baking tray that will fit inside your fridge or freezer with parchment paper
2. Blitz the Oreos in a food processor until they are fine crumbs, then add cream cheese and whiz until mixture starts to form a ball.
3. With cold hands roll the mixture into 18-20 balls about 3 cm in diameter and lace on the lined baking tray
4.put in fridge for 30 mins or freezer for 15 mins to firm up
5. Melt the chocolate either in ban marie or in the microwave. I would recommend the Ban Marie for the white chocolate.
6.Dip the end of a lollipop stick into the white chocolate and then push i into a ball so that it goes in 2/3rds of the way in-so 1/2 cms. lay the balls back on the tray with stick points upwards as you go.
7. Dip the balls in the melted chocolate swirling and letting excess drip off or you could use a teaspoon to help spread it on...then dip into the decoration or put the decoration on with hands...
stand upright in a cake pop stand or small jars...return to freezer for 10 mins.


5 Feb 2015

Chocolate coffee cake with dark chocolate ganache

I


 I finally got around to baking from this book , it's been sitting on my shelf for a few years! It has some great recipes but they are slightly more complex than the kind of baking I do on a regular basis at the moment. I normally do fairly easy kid-friendly baking ; low effort high reward kind of recipes  that I never seem to blog about - will do soon! I also never seem to blog about the things that I make over and over again like chocolate fondant puddings or tiramisu or choc chip bread and butter pudding....one of these days...drop me a line if you would like to see any of those make an appearance on the blog. Anyway back to the cake: skip this post if you don't seriously like chocolate! It's very very chocolaty -I suppose you could skip the dark chocolate ganach - you could definitely make half the amount and just do a small drizzle across. The glaze however is really fun to pour over and rather glorious in appearance.glossy gleaming and dark when you pour it on then drying to a matt finish. The vegetable shortening used in the cake gives it a bit of a different texture then your usual home made cake-I think it tastes more shop bought but that's not necessarily a bad thing here. The buttercream is so so creamy,soft and melt in your mouth  -I actually find regular buttercream too sweet often so this one is a perfect alternative, I will definitely be using the recipe for other cakes-it is slightly more labour intensive but definitely worth it. The recipe says granulated sugar for both cake and icing- a little confusing-I went with caster sugar in the cake and icing sugar in the buttercream.


Recipe


Yield: One 8-inch, 3-layer cake

Ingredients


For the Classic Chocolate Cake:

  • ¾ cup dark unsweetened cocoa powder (like Valrhona)
  • 2/3 cup sour cream
  • 2 2/3 cups all purpose flour
  • 2 teaspoons baking powder
  • 1 teaspoon baking soda
  • ½ teaspoon salt
  • ¾ cup (1 1/3 sticks) unsalted butter, cut into 1-inch cubes, softened
  • ½ cup vegetable shortening
  • 1½ cups granulated sugar
  • 1 cup firmly packed dark brown sugar
  • 3 large eggs, at room temperature
  • 1 tablespoon pure vanilla extract

For the Coffee Buttercream:

  • 1½ cups granulated sugar
  • 1/3 cups all purpose flour
  • 1½ cups whole milk
  • 1/3 cup heavy cream
  • 1½ cups (3 sticks) unsalted butter, soft but cool, cut into small pieces
  • 1 teaspoon pure vanilla extract
  • 3 tablespoons coffee extract

For the Chocolate Glaze:

  • 8 ounces good-quality (60 to 72%) dark chocolate, coarsely chopped
  • ¾ cup (1½ sticks) unsalted butter, softened and cut into ½-inch pieces
  • 1 tablespoon light corn syrup

For assembly:

  • 10 to 12 chocolate-covered espresso beans

Directions


Preheat the oven to 325 degrees F. Butter three 8-inch round cake pans, line them with parchment paper, and butter the parchment. Dust the parchment with flour and knock out the excess flour.
In a medium bowl, mix the cocoa powder and sour cream with 1¼ cups hot water and set aside to cool.
In a large bowl, sift the flour, baking soda, baking powder, and salt together and set aside.
Using a standing mixer fitted with the paddle attachment, beat the butter and shortening together on medium speed until light and fluffy, about 5 minutes—the mixture will appear to string or ribbon throughout the bowl. Add the sugars and beat on medium speed until light and fluffy, about 5 more minutes. Add the eggs, one at a time, mixing about 10 to 15 seconds after each addition until the egg is incorporated into the mixture. Then turn the mixer to low, add the vanilla, and beat until incorporated. Scrape down the sides of the bowl and mix again for 30 seconds.
Beginning with the dry ingredients, add the dry mixture and the cocoa mixture to the mixer bowl in three alternating parts, ending with dry.
Divide the batter among the prepared pans. Use an offset spatula to level the batter. Bake the cakes for 35 to 40 minutes, rotating the pans halfway through the baking time, until a toothpick inserted in the center comes out clean. Transfer the pans to a wire rack and cool for 30 to 45 minutes. Turn the cakes out onto the rack and let them cool completely. Remove the parchment.
To make the Coffee Buttercream:
In a medium, heavy-bottomed saucepan, whisk the sugar and flour together. Add the milk and cream and cook over medium heat, whisking occasionally, until the mixture comes to a boil and has thickened, about 10 to 15 minutes.
Transfer the mixture to the bowl of a standing mixer fitted with the paddle attachment. Beat on high speed until cool (this takes about 7 to 9 minutes of mixing; however, you can speed up the process by pressing bags of frozen berries or frozen corn around the sides and bottom of the mixing bowl). Reduce the speed to low and add the butter; mix until thoroughly incorporated. Increase the speed to medium-high and beat until the frosting is light and fluffy, about another 1 to 2 minutes.
Add the vanilla and coffee extracts and continue mixing until combined. If the frosting is too soft, put the bowl in the refrigerator to chill slightly, then beat again until it is the proper consistency. If the frosting is too firm, set the bowl over a pot of simmering water and beat with a wooden spoon until it is the proper consistency.
To assemble the cake:
Place one cake layer on a serving platter. Trim the top to create a flat surface, and evenly spread about 1¼, cups frosting on top. Add the next layer, trim and frost it, then add the third layer. Spread a very thin layer of frosting over the sides and top of the cake and put it in the refrigerator for about 15 minutes to firm up. (This is known as crumb coating and will help to keep loose cake crumbs under control when you frost the outside of the cake.) Spread the sides and top of the cake with the remaining frosting. Refrigerate it for 15 minutes to it firm up.
To make the Chocolate Glaze:
Place the chocolate, butter, and corn syrup in the top of a double boiler. Using a rubber spatula, stir the mixture until the chocolate and butter are completely melted and smooth.
Remove the pan from the heat and stir the glaze to release excess heat. Drizzle glaze over the cake. Refrigerate the cake for about 15 minutes to set the glaze before serving.
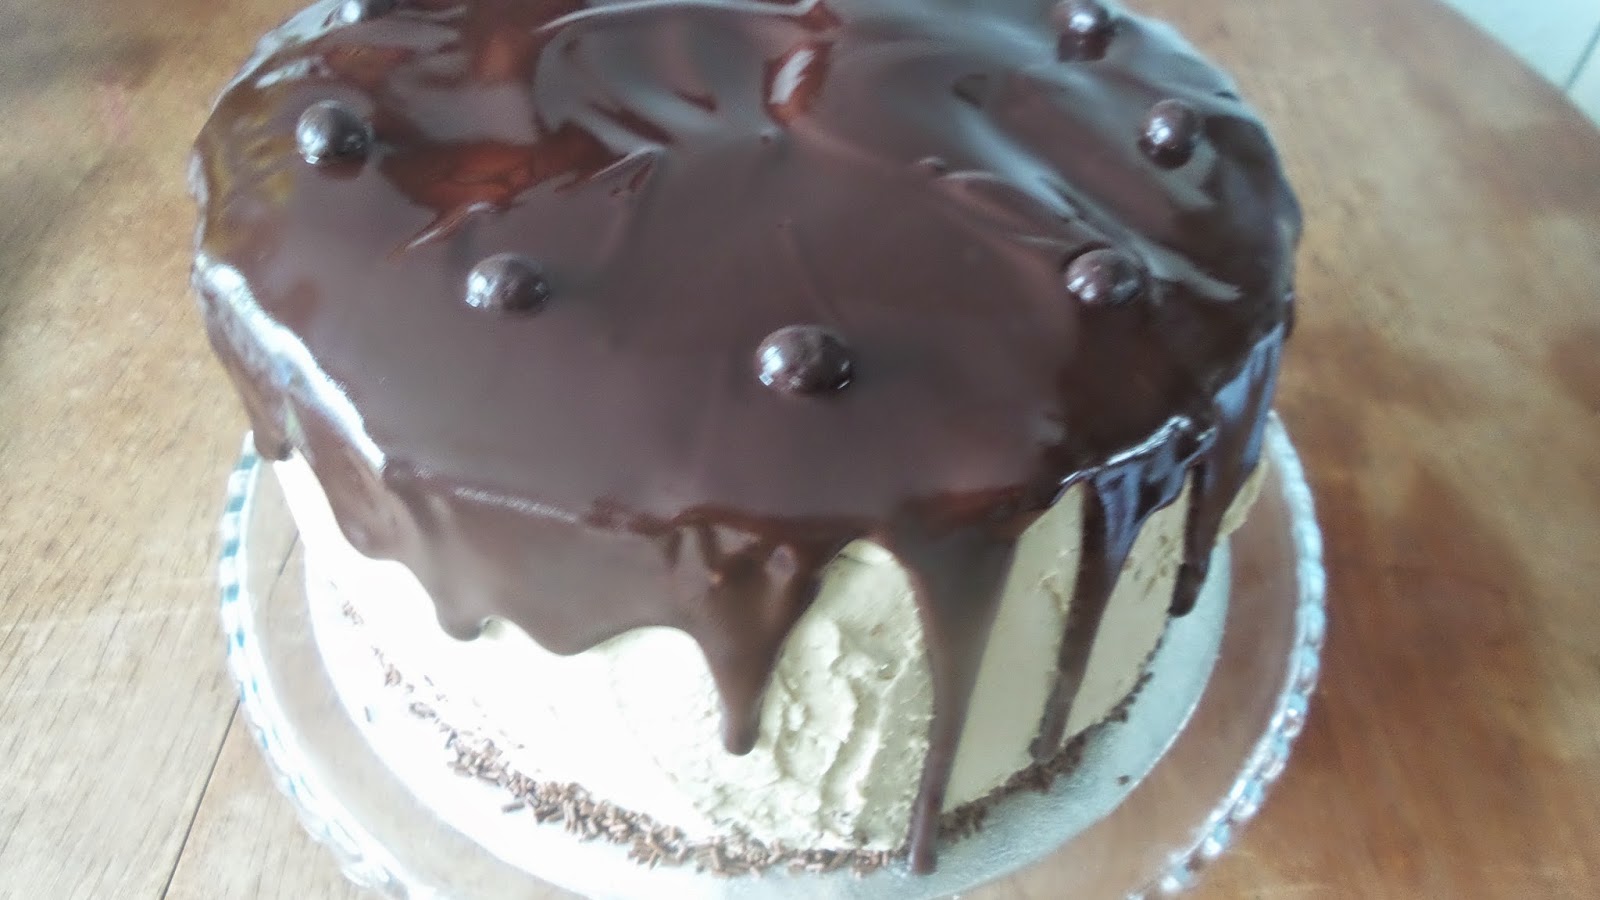
To glaze the cake:
Line a rimmed baking sheet with parchment paper. Place your cake on a wire rack over the baking sheet. Slowly pour about ¾ cup of the glaze over the cake. Use a small offset spatula to smooth it out to the edges. Place the cake in the refrigerator for 5 minutes to set the glaze. Remove from the refrigerator and slowly pour the rest of the glaze over the cake. It should run down the edges in thick streams. You should be able to control the size and length of the streams by the pour. Feel free to experiment, and have no fear in playing around. This is the fun part, and there is no right or wrong way. Garnish with chocolate-covered espresso beans. Chill the entire cake for approximately 20 minutes, or until glaze is set, then transfer to cake plate. Serve at room temperature.
The cake can be stored, covered in a cake dome or cake saver, at room temperature for up to 3 days.

Notes

There is no road map to creating the perfect chocolate ganache topping. The design (i.e., the width and number of drips) is entirely up to you. I did a fairly light ganache topping for this particular photo. For heavier ganache coverage, double the ganache recipe, pour half over the cake, and refrigerate it for 15 minutes. Then pour the remaining ganache on top.

© 2010 Matt Lewis and Renato Poliafito      

28 Nov 2014

Plum Frangipane Tart


Another bake from Jo Wheatley. Its one of those recipes that is definitely comfort cooking! I made it mostly because I had a punnet of plums to use up. They always s look so appetising in the supermarket - deep purple and juicy  that both me and my son (older son I should say now!) get seduced into buying them. Then you bring them home and they are rock hard and don't ripen. I also love frangipane (does anyone not??) so one hot summers weekend I made this for tea. Thin buttery crisp pastry encases soft sweet moist frangipane with a hint of crunch from the hazelnuts and punctuated by tart pieces of plum. I really can't wait to make it again!  It would work well with plenty of other fruits I imagine, Raspberries,Apricots....


I like this picture with the summer light streaming in through the open doors :) My tin wasn't quite deep enough so some of the filling spilled over in parts....
I like this picture too- a little bit of reality -what it's like when I am trying to take a picture, little boys and their toys have to be kept out of shot! ;0 ; Have to clear enough space on the table... 


Recipe:

you will need a 23 cm tart tin with a depth of about 3-5 cm

Sweet shortcrust pastry:
250g plain flour
125g Unsalted butter
a pinch of salt
1 large egg yolk
2-3 tbsp water,chilled

put flour and butter and salt into a food processor with a metal blade. whizz using pulse button until you have a breadcrumb consistency. Add the egg yolk, whizz briefly, then add water a tablespoon at a time until the dough comes together. Turn onto a floured surface and work very briefly with your hands until smooth.Wrap in cling film and chill for at least half an hour before using.

filling;
50g Hazelnuts, chopped (I used ready chopped one from supermarket and toasted in a dry frying pan)
175g unsalted butter,softened
175g caster sugar
3 large eggs and 1 yolk
150g self-rising flour
100g ground almonds
1/2 tsp cinnamon
6 plums, firm  

Lightly dust work surface with flour and roll the pastry out into a thickness of about 2 mm. Carefully line the tart tin, being sure to push the pastry neatly into the corners and trimming off excess pastry from the top. Prick the base of the tart shell several times with a fork. Screw up a sheet of baking parchment and use it to line the inside of the pastry case. Chill for 10 mins in the freezer.

Preheat oven 10 180 degrees
Tip baking beans into the pastry case and blind bake on the middle shelf of the preheated oven for 20-25 minutes until pale golden. Remove the baking parchment and beans. Reduce oven temperature to 170 degrees and bake the case for a further 5 minutes. 

Tip hazelnutes onto a baking tray and lightly toast in the oven or in a dry frying pan

to make filling mix together butter,eggs,sugar,flour and ground almonds. Cut plums into quarters and arrange evenly spaced,skin side up around the tart. Bake for 35-45 mins or until golden, if tart colours too quickly cover with foil.

cool in tin for 10 minutes and then transfer to a wire rack to cool completely.   
  

17 Oct 2014

American style chocolate chip cookies


Finally some time to blog! 3 months post baby no.2. I have been trying to get to this space and failing. I finally made it, admittedly at the expense of putting the laundry away and tidying the kitchen...but you know life's too short.... ! 

These chocolate chip cookies have been on my list of things to blog about for ages, I have plenty of other things to blog about too,possibly more exciting things than some classic cookies but they will take a bit longer so lets go with these to begin with! You have got to have a classic choc chip cookie recipe in your repertoire right?  Well I have made these Nigella one loads but never managed to take a picture.They really are excellent. The raw dough is yummy too and they freeze well so you can have a batch handy anytime.The pics here are for the recipe from Jo wheatleys A Passion for Baking, one of my most used books.Totally scrumptious though I'm not keen the demerara sugar as you can taste the crunch of the sugar in the cookie too much so I may substitute with some other form of brown sugar or just use all light brown soft sugar next time. How long you cook them for depends on how gooey you want them in the center, and if you prefer a Bens cookies style cookie (if you haven't tried them you really ought to!) then you can omit the banging the tray on the counter step. Recipe below pics. Its nice to be back :) 


200g unsalted butter, softened
200g light soft brown sugar
125g Demerara sugar
2 large eggs,beaten
1 tsp Vanilla
400g plain flour
1 tsp baking powder
1 tsp bicarbonate of soda
a pinch of salt
200g dark chocolate chunks.

Preheat oven to 170 ◦C
Cream butter and sugars until light and fluffy. Gradually mix in eggs and mix well, add vanilla extract and mix again.

Sift in flour, baking powder, salt and bicarb and mix until combined.

Fold in the chocolate chunks

Bake the cookies in batches on middle shelf of oven. bake for 5 mins then remove from oven and bang the tray sharply on the worktop to deflate the cookies, then return to oven for 5-7 mins.

Allow cookies to cool on baking tray for a few mins then remove to wire racks until cool.

28 Mar 2014

Espresso Tiramisu Mini Cupcakes


These yummy cupcakes are from Making cupcakes with lola  (the same book that the red velvet cupcakes are from. I used instant espresso powder instead of ground espresso and the coffee taste just was not strong enough so if you do use instant espresso powder double up the quantities and taste the batter/icing and add more if needed! The recipe says it makes 24 normal cupcakes or 48 mini-I used mini gold cases and think I made much more than 48,so you may want to make half the amount listed below...apart from those disclaimers which I thought I would get out of the way,  these cupcakes are great. The sponge is soft and moist with a nice bite from the chocolate chips and the marscapone and double cream icing is really nice -not too sweet and very flavorful,soft and dreamy-I would definitely use it for other coffee cakes too....


Recipe:

400g plain flour
4 tsp baking powder
1 tsp bicarbinate of soda
1/2 tsp salt
2 tsp ground cinnamon
1 tablespoon ground espresso
275g sugar
120ml sunflower oil
150 ml plain yoghurt
150 ml milk
2 eggs beaten
200g dark chocolate chips
24 or 48 chocolate covered cocoa beans

Espresso Whip
600 ml double cream
50g confectioners sugar
2 tsp ground espresso
250 g marscapone

Preheat oven to 180◦.
Sift together all the dry ingredients apart from the sugar. Put the sugar, oil, yoghurt,milk, chococolate chips and eggs  into another bowl and whisk well with a balloon whisk. Add the wet mixture to the dry and fold in gently -do not overmix. Divide the mixture between cases and smooth tops. Bake for about 25 minutes for normal cupcake size, less for mini ones, until risen and a skewer comes out clean.Let cool before decorating.


3 Mar 2014

Profiteroles


I have been meaning to post these for an age (like all the other trillions of bakes.....). You really can't beat a classic profiterole and they are so much better freshly made than from the supermarket. They might seem a little fiddly to make but actually its fairly straight forward and this recipe is fool proof! And you could make the choux buns the day before you needed them and store in an airtight container and fill with cream on the day you needed them. Recipe is posted below and is from the Great British Bake Off book. I did find the chocolate sauce a bit dark so you could tone it down by substituting some milk chocolate instead of the dark....


Choux pastry (makes 12 eclairs or 48 profiteroles)

100g plain flour
1/4 tsp salt
75g unsalted butter, diced
3 free range large eggs at room temperature

Put flour onto a sheet of greaseproof paper. Put the salt, butter and 175 ml water into a medium-sized pan and heat gently until the butter has melted completely - don't let the water boil and begin to evaporate.Quickly bring the mixture just to the boil, then tip in the flour al in one go.

Remove pan from heat and beat furiously with a wooden spoon. The mixture will look a mess at first, but don't worry - as you beat it it will turn into a smooth, heavy dough. Put the pan back on low heat and beat for about 2 minutes to slightly cook the dough until it comes away from the sides of the pan in a smooth glossy ball.

Tip the dough into a large mixing bowl and leave to cool until barely warm. using an electric mixer (wooden spoon won't give same result) gradually beat in the eggs, beating well after each addition. Add enough egg to make a very shiny and paste like dough that just falls from the spoon when lightly shaken. You may not need the last tablespoon or so of egg because the dough has to be stiff enough to pipe and if the dough is too wet it will spread out rather than puff up.

Use immediately or cover tightly and keep at room temp. Use within 4 hours.

Preheat oven to 200 ◦C. Pipe mounds of dough using a piping bag fited with a 1.5 cm round nozzle. Make them about 3cm wide and 2cm high on the prepared baking sheets spacing well apart. dip your finger in water and pat down any point tips on the choux buns.

Lightly brush with beaten egg. Bake for 15 mins then reduce oven temp to 180◦C . Quickly open and close oven door to get rid of steam and the bake for another 5 minutes. Romveove from oven and make a tiny hole (with a toothpick) at one side to let out the steam. Return the sheets to the oven and bake the profiteroles for a final 3 to 4 minutes until firm. cool on a wire rack.

Cream and chocolate sauce:
cream:
250 mls double cream
2 tablespoons icing sugar
1 teaspoon vanilla extract

whisk until firm enough to hold a peak

Chocolate sauce:
100g dark chocolate
25g unsalted butter
2 tablespoons icing sugar
100 ml water

Put all ingredients into a small pan and heat gently until smooth

Just before serving fill profiteroles with cream by piping in through a hole or by splitting the buns in half and drizzle over the hot sauce 


23 Feb 2014

Grown up go-to chocolate cupcakes


Yes I know I sound a bit american with the "go-to" but seriously every time I think of making of chocolate cupcakes this is the recipe I go to. Never mind all those recipes earmarked in the Hummingbird bakery books....I say grow up because they have lots of dark chocolate in them. I have been making them for a long time and have made them a lot over the years so I can't believe I am only just sharing them with you now!  You have to try them to know what I mean when I say they are really good! Tender, soft, very chocolatey sponge topped with a thin cap of crisp dark chocolate. And super easy to make too. Recipe is from the book by the author of fave blog Orangette "A Homemade life". A little instruction from experience: do not overfill the cases-the batter is very liquid and the cakes rise quite a lot and will be very soft when cooked. So under fill if anything! And seeing they are delicate when taken out of the oven use foil or thick cupcake cases if you can.


For the cupcakes:
1 oz finely chopped dark chocolate
1/2 cup hot coffee
1 cup sugar
3/4 cup plain flour
1/2 cup cocoa powder
1/4 tsp baking powder
1/2 tsp bicarbinate of soda
1/4 tsp salt
1 large egg
1/4 cup canola oil
1/2 cup plain yoghurt
1/4 tsp vanilla extract

For the glaze:
8 oz dark chocolate 

Preheat oven to 300 ◦ F or 150 ◦C
Pour hot coffee over the chocolate and leave to melt stirring occasionally.
In a medium bowl whisk sugar, flour, cocoa powder,baking soda, baking powder, and salt.
In a separate bowl/mixer beat the egg on medium speed until it is pale yellow, about 1 minute. Add the oil,yoghurt and vanilla, beating well.Gradually beat in the chocolate mixture. add the dry ingredients all at once, and beat on low speed until the batter is just combined. Spoon batter in cupcake cases. bake for 20-25 mins or until skewer inserted comes out clean. Allow to cool completely before glazing. To glaze, melt chocolate and spread a thin layer on each cupcake with a teaspoon. let the glaze harden before serving.
Recipe in book says this makes 12 muffin size cupcakes but with the gold liner I use I always end with 25-30! I also also have melted chocolate left over so you may want to melt less than 8 oz for the glaze.....   


29 Dec 2013

All butter vanilla pod and chocolate wedding favor iced biscuits


I have been wanting to try iced cookies for awhile now (or sugar cookies as they are called in the states). I finally got the chance to make them for a friends beautiful small wedding. My first time attending a wedding with only 21 people and my first time making iced biscuits too! So I was a little nervous and planned well ahead (oh what fun it was looking at all the different cookie cutters and decorations!) I had to restrain myself and stick to two shapes and two beaded decorations. I looked up how to make the cookies on lots of different websites. You could take a look here and here. I had Miranda Gore Browns book Biscuit from the library so I used her cookie and icing recipe..Purple was the colour to go with the brides flowers hence the purple-I used violet gel colouring from Wilton.    I bought the little bead decorations when I went to the cake and bake show. The biscuits were really delicious-buttery and crisp, I made them a week in advance and stored in an airtight container and stored in the fridge. They stayed nice and fresh and were still crunchy. However when you do the icing you have to leave them overnight to dry (yes it really is a bit like painting!) and this is when they go a bit soft-they still tasted great though and I do not think you can avoid that. I used the writing tubes to do the outline on the cookies and the squeezy bottles to do the filling in (best thing for the job). You make a slightly stiffer icing for the outline and a thinner one for filling in. I made way too much icing (have frozen half) but seeing as it was the first time I made it I didn't want to run out! Toothpicks were very useful for smoothing out bubbles when doing the filling in. I also put toothpicks into the writing tips to stop them drying out. Equipment and recipes listed below pics:


Here's the equipment I used:
Heart cookie cutter
wedding cake cookie cutter
PME writing tube No.2 (X2)

3 oz Squeezy bottles (x2)
4 bowls 
2 piping bags
toothpicks 
trays for drying cookies

Recipes:
Royal icing
Makes enough to cover at least 24 biscuits
13g Merriwhite (dried pasteurised egg white powder)
500g icing sugar
150 ml warm water
1 tbsp lemon juice or flavouring,such as lemon,orange or lime juice (optional)

Put the dry ingredients into a bowl, add the warm water and lemon juice and beat well to form a thick paste (this will take about 7 minutes in a mixer on the highest speed.) You can then add a tiny bit of extra water to make it a good thickness and even more water to make run-out icing. To check the consistency of the run-out icing,pull a spoon through the mixture-the icingh should return to being completely smooth.

Chocolate biscuits
Makes 24
55g dark chocolate
200g soft unsalted buter
160g caster sugar or vanilla sugar
50g golden syrup
1 egg lightly beaten
350g plain flour
50g cocoa powder

You will also need
5-6 cm cutters (to make 24 biscuits)
Preheat oven to 180 ◦C
Melt the chocolate (see page 6). Cream the butter with the sugar,then beat in the melted chocolate and syrup until light and fluffy.
Add the egg and mix well. Sift in the flour and cocoa powder, then mix together until dough forms . Bring together with your hands and divide in half. Roll each half into a ball and flatten into a disc.wrap each disc in clingfilm and put in fridge for atleast 1 hour. Roll out each chilled disc between two sheets of clingfilm, then stamp out your shapes. Place on baking trays lined with greaseproof paper spacing them atleast 3cm apart, and chill for another 15 minutes.
 Bake for about 10 minutes until surface is dry and the base is firm. Allow to cool on the tray for 10minutes, then use a palette knife to transfer to a cooling rack. Decorate when complete cold.

Vanilla pod butter biscuits
Makes about 24
200g soft unsalted butter
200g caster sugar
seeds from 2 vanilla pods
1 large egg lightly beaten
400g plain flour preferably 00
 you will also need 6 cm cutters

Preheat oven to 180 ◦C
Cream butter,sugar and vanilla seeds until light and fluffy. Beat in egg and then add flour and mix on a low speed until dough forms. Shape into two flat discs and wrap in clingfilm. Chill for atleast 30 minutes. roll out dough between two sheets of clingfil and cut out your shapes. place on baking sheets lined with greaseproof paper atleast 3 cmm apart. Chill for atleast 15 minutes. Bake for about 9 minutes until golden brown at the edges. Allow to cool on trays for about 5 minutes the use a palette knife to transfer to a wire rack. decorate when complete cold.